 Part of our lunch routine is to finish with yogurt. This used to be generic fruit flavoured, and has gradually evolved to live yogurt, then plain yogurt with fruit, jam or lemon curd. Plain yogurt is easily obtained in 1 litre tubs (I like Yeo Valley) but even though the tubs are made of recycled plastic, it’s still an awful lot of plastic in a year.
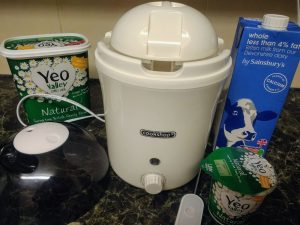
So, as described in an earlier post, I’ve been experimenting with making my own yogurt. I’ve been making it regularly since Spring (even while out on our narrowboat) so I’ll write up my final ‘recipe’ here. I have been specifically aiming for a thick and creamy yogurt with a mild flavour, but you may be less fussy. Your result will be largely governed by the yogurt starter you use, I really like Yeo Valley. I use an electric 1 litre yogurt maker, the simplest way to maintain the right temperature throughout the process, though I’ve discussed other methods previously and list instructions for other options at the bottom of this page. (eg If you pre-warm the milk, you can incubate it in a 1 litre wide-mouth flask.)
The process takes about 12 hours, so start it at a time when you can attend to it again in 12 hours, like 9am or 9pm. The initial stage is only about 10 min.
- 1 litre UHT whole milk
- 2 heaped dessert spoons plain bio yogurt
Put a couple good dollops (heaped dessert-spoons) of plain, live yogurt into a small jug. Stir in some milk, then a bit more until the yogurt is quite thin. Pour the milk mixture along with the rest of the milk into the yogurt maker, turn on and cover. Leave untouched for 11 hours. (It will be yogurt after 8 hours, but longer makes thicker yogurt). When done, turn off, and leave for an hour or two. Then remove inner container and put in fridge to chill.
I used to pre-warm the milk, but being hurried made it grainy rather than smooth.
I then transfer mine to one of the old 1 litre Yeo Valley rectangular tubs I have kept, for better use of fridge space, and also so I can start another batch when the current one is not yet gone.
NOTES:
- I use UHT milk because fresh milk needs scalding to 82°C then cooling – which is a faff and basically what was already done in the UHT process. I’ve done both ways and can’t detect any flavour difference (though I found a site that says only use fresh milk). Very handy to be able to keep in stock, and my council takes cartons for recycling. You can use evaporated milk – a large can plus same again of water. I haven’t tried this for flavour, but I’ve heard several people say this is what they do. You can also use sterilised or flavoured milk, but of course they come in plastic… so you haven’t gained anything.
- If you use fresh milk, warm to 82°C as slowly as possible, the effect on the molecules apparently helps it to get thicker. A slow cooker does a great job, takes about 2 hrs.
- Use 1/3 or 1/2 of a small pot of live yogurt (2 heaped dessertspoons or 50-70g), and the freshest you can. The brand you choose will influence the flavour you get. For what it’s worth, Yeo Valley yogurt (which I use when I need a new starter) is live, organic, British, and packaged in recycled and recyclable plastic. There are probably others around too. (I recently tried M&S, it worked but I didn’t like the texture.)
- If you are making yogurt frequently, you can use some of your previous batch to start the next one, at least a few times, or the remainder of the small pot. The worst that can happen is it might not be as thick.
- To thicken yogurt, strain through 2 layers of muslin cloth for about 15-20 min. However this removes about 1/4 litre of whey – which means less yogurt! You can use the whey to replace milk when baking cakes or scones. It slightly reduces the sweetness of cake.
- Currently, l thicken by add 4 Tbs (¼ cup) milk powder. Put in a jug with COLD milk and mix well until dissolved, and add to the rest of the milk through a fine sieve, muslin or clean handkerchief.
- If you buy muslin for straining, get .5m and sew a fine hem around the edge. Wash before first use. Fold in half to line a colander, and put the colander over a small bowl or pan to catch the whey. Rinse the cloth well after use, then put through the washer with your whites. If you make yogurt frequently, you might want two cloths.
- Sometimes yogurt seems to go a bit thinner after a week or so. Strain it for a while and it will get thicker again, and put back into a clean tub.
- No two pots of yogurt seem quite the same from the supermarket, so it’s OK if yours varies a bit too. 😉
Some useful resources elsewhere, if you want to know more:
- Slow cooker bio yogurt
- Ways to get thicker yogurt
- Best temperature for incubation
- More than 6 ways to incubate yogurt…
- Forum discussion of incubation
- How to strain yogurt
- Troubleshooting
(edited Apr 2019)