 Odd title, ‘adventures in yogurt’ – what’s adventurous about yogurt? Exactly! But for those of us who haven’t ever done it before, it’s all a bit mysterious and vague. Some people just go for it, but some of us like to have a recipe. Now, recipes can be flexible, or ignored, but it gives us a starting point.
I have yogurt pretty much every day. It used to be little pots of flavoured yogurt. Then I was looking for a live yogurt with fewer additives, and moved to Yeo Valley – still the little pots, but so nice! Then, as awareness of our global plastic problem increased, I moved some months ago [June 2017] to the 1kg size, which we flavour sometimes with lemon curd or jam – or often these days just have with fruit.
As part of Less-Plastic Lent [2018], I thought I’d try to make my own yogurt. I didn’t want to buy another gadget (which is probably mostly plastic) if I don’t know I’m going to stick with it, so a recipe caught my eye that uses a slow cooker for the yogurt. Ideal! And in various discussions with the Lent Facebook group I’ve learned all kinds of things that I thought I would gather in one place for easy reference.
(Note – if you want to try the slow cooker recipe, I recommend starting your process about 5-6 hours before you plan to go to bed… there is a lot of waiting. It will be ready to put into the fridge in the morning.)
Ingredients: just milk and plain live yogurt (about 2 Tbs live yogurt per pint of milk, or 50 ml per litre). I used just a pint of whole milk, my first try. Whole milk yields a naturally thicker yogurt than skimmed milk, but with skimmed milk you could try adding 2-4Tbs powdered milk if you want a thicker result.
For background information, any milk will “work” (skimmed, semi skimmed, or whole) but the results are a matter of preference. Fresh milk needs to be heated to 82 C (scalding) then cooled to 43 C (barely warm to touch) before adding the starter yogurt. I personally value the precision of numbers to work towards, although I don’t know how critical this is.
But you can use UHT milk (again, whole or not as you wish) or even evaporated milk (mix with equal volume of water) or pre-flavoured milk. And if you use these, you can skip the initial scalding stage, which must massively simplify the process. Some people can’t tell the difference from using fresh milk, some can, and some even report they get a smoother texture with UHT milk.
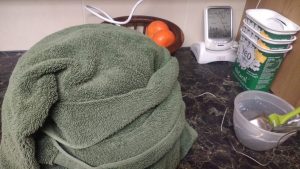
Equipment: something to heat the milk, something to check the temperature (until you calibrate your fingers) and something to keep it warm for 9-12 hours to incubate. A slow cooker (wrapped in a towel and/or freezer bag) can do both, but a saucepan followed by a thermos flask or anything insulated or able (like a large pot) to be wrapped in a towel (or Wonderbag, or haybox, or airing cupboard – you get the idea) will do.A yogurt maker will do all three.
I tried an Easi-yo maker, which is basically a plastic flask, and yes it made yogurt but thinner than I like. Ideally put in an airing cupboard. A metal flask likewise only maintains the temperature for 4-6 hours, so a warm place is crucial.
Method: If using fresh milk, heat it SLOWLY to 82°C. In a slow cooker on High, this will take a couple hours. In a pan on the hob, obviously not so long. Warning, if you heat it too quickly on the hob, the texture will be grainy rather than creamy. (I’ve read that if you want to keep it at 82°C for up to 20-30 min, the resulting yogurt will be thicker.)
Unplug the slow cooker, or take the pan off the heat and pour the milk into the container you plan to use for the incubation. Allow to cool to 43C. In your slow cooker this might take 2-3 hours if left to itself. If you want to take the crock pot out and put it on the counter it might take 1 hour. Putting the pot in a bowl of cool water would hurry it a bit more – I know someone who does this. But slower means thicker.
Put your starter yogurt in a bowl or small jug and gradually add some of the warm milk to it (about twice as much as you have yogurt), stirring well so it’s fully blended. Then pour it back into the warm milk. Stir well, cover, wrap a towel around or whatever insulation you have, and leave it undisturbed for 9 to 12 hours. I think longer might mean thicker, I leave it 12 hours.
[UPDATE] Lately I’ve been getting a good thick yogurt with 1 litre UHT whole milk, 2 heaped dessertspoons of yogurt from the previous batch, and some powdered milk.
If you don’t use powdered milk, straining always gives a great result, but I’m glad to skip that step when I can! Straining also means you end up with less yogurt and so have to do it more often. But it rescues a batch that isn’t as thick as you want. [/UPDATE]
That’s it! Take the cover off and spoon into whatever storage containers you want to use, and chill in fridge.
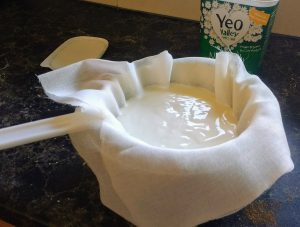 However, I personally like my yogurt fairly thick and creamy, so I did one more step and strained some of the whey off. This is totally optional, a matter of personal taste.
Put a sieve or colander in a bowl or over a pan and line with a couple layers of muslin, or several layers of cheesecloth. Pour your fresh yogurt in, and leave there for 10-20 min, or until it’s the consistency you want.
The clear whey that comes through the muslin can be used for baking scones or cake. Strained yogurt is less likely to separate when used in cooking. Strain for 12 – 48 hours for Greek yogurt. (Obviously the total volume of yogurt is reduced proportionally.)
Some useful resources if you want to know more